In my quest to be basic on a budget, I felt it imperative that I find a way to make my own smoothie bowls.
I spent a good part of my day yesterday watching Youtube tutorials, trying to figure out how to get the perfect consistency. Now, you might like yours a bit thinner than I do, but I went for a thick and creamy banana smoothie bowl with some fun goodies on top.
You will need:
1/2 Cup Almond Milk (or any milk you prefer, really doesn't make a difference!)
1 Oikos Banana Cream Greek Yogurt
1 Frozen Banana
1 Scoop of Vanilla Vega Protein Powder
1/4 Cup of Crushed Ice
Toppings:
This is up to you! Fresh fruit, Coconut Flakes, Seeds, Nuts, Granola, Chocolate Chips, go crazy!
I topped my bowl with Kind Banana Nut Clusters, Chia Seeds, and Strawberries
Now that you have all the ingredients together, all you have to do is throw it in a blender! Yea... it's that easy! I have a Magic Bullet (Thanks to my awesome brother) and I think it works perfectly for something like this, because it's so easy to measure out how much you're making!
If, while you're blending, you find that it is too thick, feel free to add a splash more milk and continue to blend until you get the consistency you want!
Now decorate it, pour yourself a delicious cup of coffee, and take a cute pic for Instagram! Tag me @MessyAndThriving and let me know how you made it your own! Get creative!
Showing posts with label DIY. Show all posts
Friday, August 25, 2017
Tuesday, July 18, 2017
Healthy Dinner Idea!
Just yesterday my mom announced we would be having turkey tenderloin for dinner- a favorite in my house- and I knew there had to be some way to use the left overs! Well here it is! And so simple to make! Ugh I love food that loves your body back.
Step One: Quinoa
-Prepare one cup of quinoa in 2 cups of water. Add in 1 tablespoon of olive oil, and red pepper flakes, salt, pepper, and garlic powder to taste. Bring to a boil then reduce heat and let simmer for 15 minutes, covered until the quinoa has absorbed all the water
Step Two: Brussels Sprouts
-Measure out a cup or so of whole, frozen brussels sprouts and add them to a small pan with olive oil, a pinch of salt & pepper, and 1 teaspoon of minced garlic. Toss in pan until fully thawed and cooked. Should be crisp around edges. Optional: Slice sprouts in half and let cook face down in pan for a crispier taste
Step Three: Potatoes
-I had these left in my fridge from the previous evening, but all I did was cut small yellow potatoes in half and place them on a baking sheet. They were drizzled with olive oil and a little bit of sea salt before they went into the oven for 20 minutes at 400 degrees. Once they are done cooking, sprinkle on a little Parmesan cheese while the potatoes are still hot, it gets a little crispy and tastes delicious.
Step Four: Dressing
-This was so easy, and I made it up in the moment. All it is is, 2 tablespoons of fat free mayonnaise, 1/2 teaspoon of warm water, 1/2 teaspoon of garlic, and a splash of Franks Hot Sauce. I stirred it until I got the consistency I wanted. If you would like your dressing a little thinner add a bit more warm water and stir.
Step 5: Turkey Tenderloin
-I try to stick with white meat and this is one of my favorites. It is a Shadybrook Farms Turkey Breast Tenderloin. We've been able to find it at Stop & Shop and Target. I rinsed off some of the marinade they put it in, to cut down on salt, then wrap it in tinfoil and place it on a baking sheet. It cooks in the oven for approximately 30 minutes at 400 degrees which is perfect because you can cook the potatoes and turkey at the same time! Once done I sliced it and served. For this meal, I diced some of the left over slices and warmed them in the microwave before adding them
Step 6: Greens
-Go ahead and throw in whatever greens you want. I only added romaine to the bowl because it's what we had in the house, but I bet it would be great with spinach, or a spring mix!
Now that all your ingredients are prepped, go ahead and assemble your bowl! Be sure to get creative, change up ingredients and make it the best fit for you. Send me pictures on instagram if you try it out!
Labels:
buddha bowl,
celiac,
clean eating,
cooking,
dinner,
DIY,
gluten free,
healthy,
inspiration,
oven,
success,
summer,
summer meals,
turkey,
vegetables
Monday, April 25, 2016
DIY Finals Calendar
Hey Pals!
Here comes another finals week post (AGH)
I have found that the best way for me to be successful, is to write out everything clearly (sometimes with a fun creative flair) so that all my obligations are right in front of me and easy to read!
So I decided to come up with an easy to make calendar so you can outline your next few weeks easily!
Supplies:
-2/3 sheets of paper (depending on how many weeks you want to plan
*consider printing fun patterns from the computer on a full page of paper, or scrapbook paper!
-scissors
-colorful pens, a pencil, and a black sharpie
-a ruler
-washi tape
-post-it notes
Step 1:
Cut your 2/3 base pages to approx 8.5x11- the size of a normal piece of computer paper
Step 2:
Measure out your weeks and color them in.
-Holding the page landscape form, draw a horizontal line down the middle of the page
-For the top row of boxes with only 3 days, each box is 3.5 inches wide
-The bottom row boxes are 2.6 inches wide
-Add a line 1 inch from the top of the page, and 1 inch from the middle line to create the boxes for the day titles
-Write over all your pencil lines in sharpie
Step 3:
Write in your days of the week!
Step 4:
Use Washi Tape to attach the three calendars together either vertically or horizontally
Step 5:
Using your own color coding system, start to fill in exams, and try to plan out time to study.
*I also used cute inspirational quotes and journaling cards to block out dates where I won't be studying due to events on campus or at home
Step 6:
Use Washi Tape to attach the calendar to your wall and start living the organized life!
xoxo, CourtneyBridget
Friday, March 18, 2016
March 21-27 Weekly Planner Layout
Hey Pals!
It's been too long since I posted something planner themed, so I thought I'd share my weekly layout for this coming week in my Plum Paper Planner!
I've mentioned it before, but I really just love my PPP, and can't recommend it highly enough if you're an Erin Condren fan, but aren't ready to pay the Erin Condren price! I'll link the Etsy shop at the bottom of this article!
I am not huge on a ton of stickers because sometimes my planner can get a little busy, but I love using colorful functional stickers, and adding a little flair with some washi tape!
Comment below with your favorite way to decorate your planner!!
Enjoy!
Xoxo, CourtneyBridget
https://www.etsy.com/shop/PlumPaperDesigns
It's been too long since I posted something planner themed, so I thought I'd share my weekly layout for this coming week in my Plum Paper Planner!
I've mentioned it before, but I really just love my PPP, and can't recommend it highly enough if you're an Erin Condren fan, but aren't ready to pay the Erin Condren price! I'll link the Etsy shop at the bottom of this article!
I am not huge on a ton of stickers because sometimes my planner can get a little busy, but I love using colorful functional stickers, and adding a little flair with some washi tape!
Comment below with your favorite way to decorate your planner!!
Not everything is filled out yet, somethings are still up in the air, and I just hate having to cross things out! Also, I save the bottom check list boxes for homework assignments that are assigned throughout the week!
Enjoy!
Xoxo, CourtneyBridget
https://www.etsy.com/shop/PlumPaperDesigns
Labels:
Calendar,
college,
DIY,
Erin Condren,
fashion,
growing up,
inspiration,
life,
lifestyle,
Monthly,
Organization,
Planner,
Planning,
Plum Paper Planner,
post-its,
Preppy,
school,
Student,
Weekly
Sunday, February 7, 2016
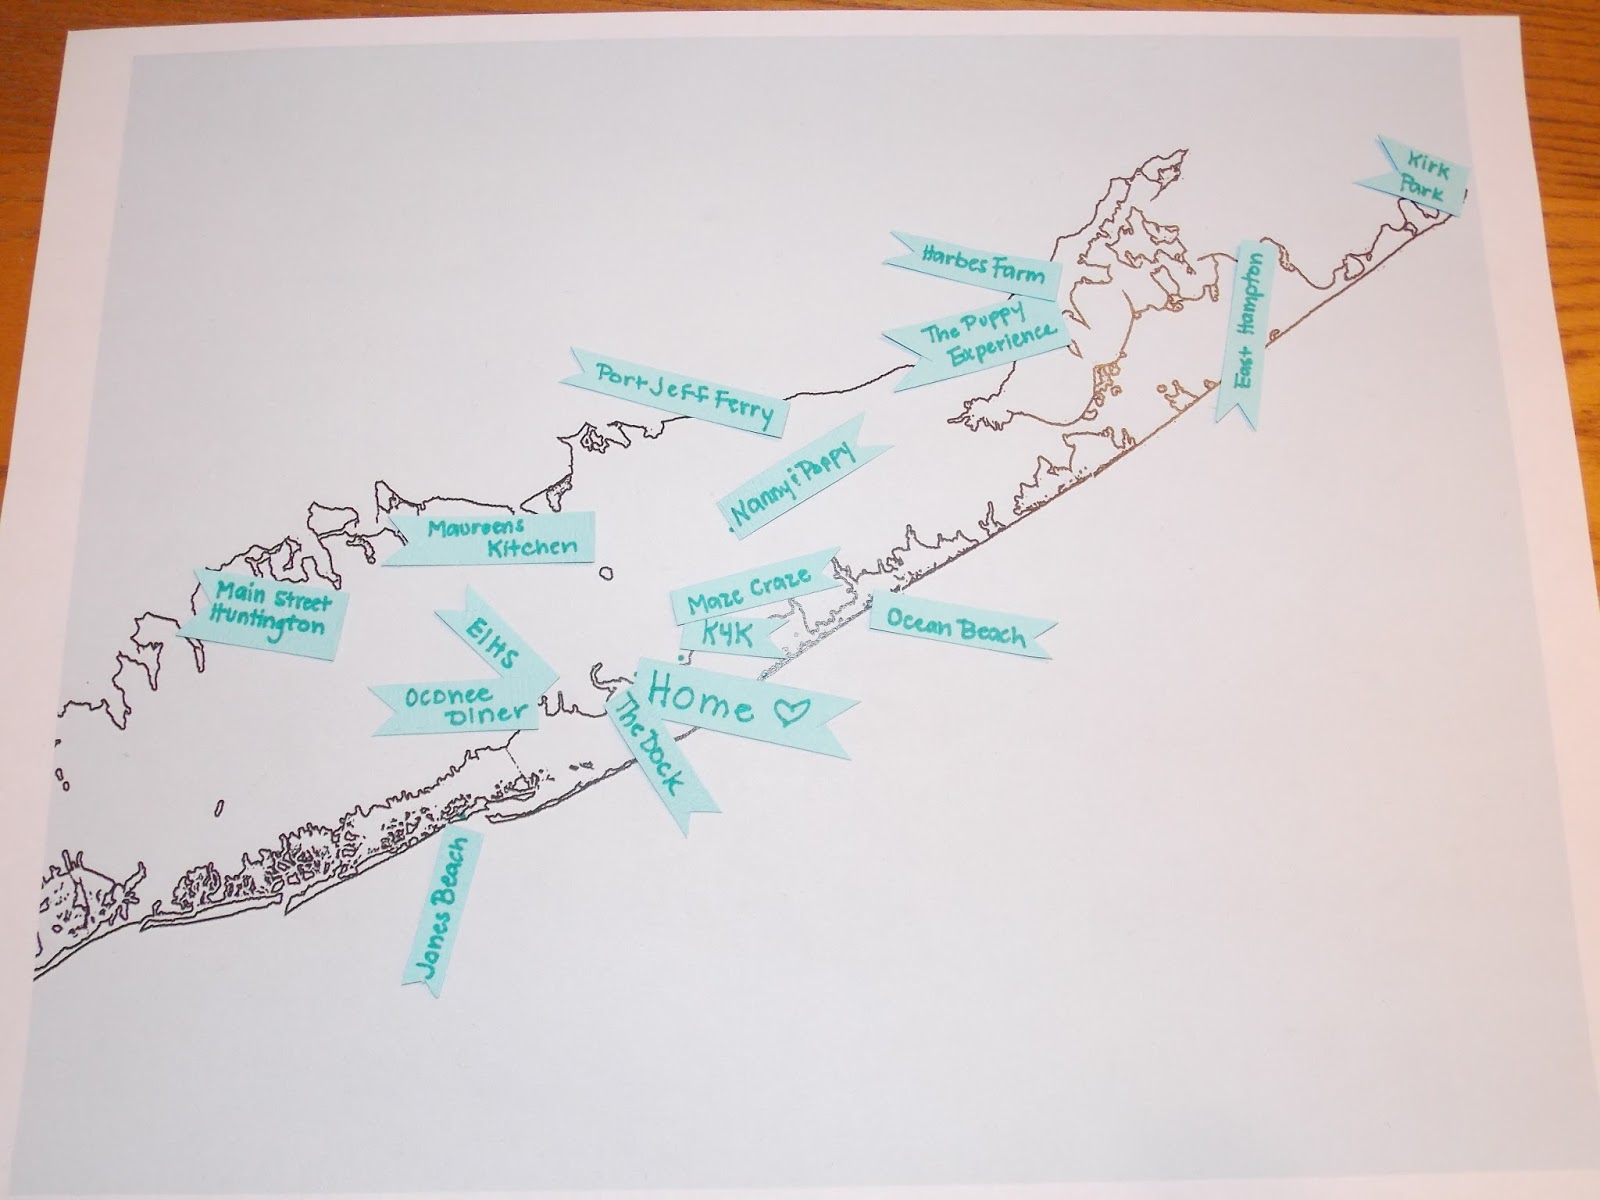
DIY 'My Favorite Places' Canvas
Well Hey There Pals!
So in a moment of feelin' a little low, I decided to drive myself out to Michaels craft store off campus. I needed a moment to just be alone, not thinking about my responsibilites, or what auditions I have to go to. I just wanted to wander the aisles, looking at all the stuff I probably shouldn't buy because I need to pay for real things like food.
I found myself feeling a bit homesick, and thought 'how can I create a little homage to my lovely island?'
And I ended up with this:
What You'll Need:
-A Level 1 Canvas {I used 8x10, but you can use any size you'd like!}
-Modpodge & brush
-Scissors
-Rhinestones or small embellishments
-Scrapbook paper
-Sharpie or pen
-Super Glue
Step One:
Go on your computer and find 2 images. 1 being a very detailed map of your hometown, your state, your county, whatever it is you'd like to have with you at college. You will use this as a guide for all your points! The 2nd being a PNG file, black outline map of the same area. You want very little details and no labels.
Step Two:
Head over to an editing site like 'Pic Monkey', and paste your PNG file onto a blank white canvas. Add whatever background color you'd like! My dorm is all white, blue and gold, so I went with a very light turquoise.
Step Three:
Print it all out in color!
Step Four:
Take your scrapbook paper and very carefully write out the names of all your favorite places. You want these to be quite small because if some of your pinpoints are close together, you want to be sure there is no overlapping! Cut each of your tags out in whatever shape you want, I did these little flags! **Be sure to leave a little space before the beginning of each name for your embellishments or rhinestones!
Step 5:
Now is time to Modpodge your outline map to your canvas. Go SLOWLY! This is really easy to screw up and end up with a cockeyed canvas, so take your time! First apply Modpodge directly to the canvas like a glue, and lay your map on top, as smooth as possible. Give it a few seconds to dry, try and smooth out any bubbles. Then apply another coat of Modpodge on top of the map like a sealant. Let dry for 15 minutes.
Step 6:
Lay out all your tags on your map to see what arrangement works best for you!
Step 7:
Start gluing! One by one glue down your tags. Don't go glue crazy, a little bit goes a long way! Let the glue dry for 10 minutes.
Step 8:
Add your embellishments like little pinpoints on your map! Let dry for 5 minutes.
Step 9:
Fold each tag up ever so slightly so they stand away from the canvas, making it more three dimensional!
And there you have it! I absolutely loved this, and am so happy to see it on my wall everyday!
If you decide to do this craft, tweet me @messyndthriving or tag me in a picture on Instagram @MessyAndThriving so I can see!!
xoxo, CourtneyBridget
Wednesday, January 27, 2016
Custom Dashboard!
Well hey there Pals!
Today I thought I would walk you through how I create my own dashboards!
It's so crazy easy, I swear this only took me about 15 minutes once I had all the supplies!
Check at the bottom of this page for the links to where I got all of my supplies [Amazon is bae.]
You will need:
1. Find 2 patterns you love. You can print them on plain old computer paper, or you can get scrapbook paper, or whatever makes you smile!
I love Lilly Pulitzer so I printed two full pages of some of my favorite patterns!
2. Cut both pages to size. The should be approximately 6.15 inches in length and 8.11 inches in length depending on your planner! I used a note page from the back of my Plum Paper Planner as a guide, but if you have a Kate Spade, or an Erin Condren, you might have to adjust your sizes!
3. Tape the 2 pages together with your patterns facing out, this way there's even something cute to see when you turn the page!
4. Using that note page, or a bookmark from your Erin Condren, mark where each of the holes are for your coil or binder rings with a small black dot.
Now you may be thinking, 'but I want it to be laminated! Fear not! That step is coming! We want to mark our spots before we laminate so the pen marks don't rub off!
5. NOW we laminate! They make really awesome self adhesive laminating sheets that you can use, or you could go the poor girl route like I did and use packing tape! As long as you do it carefully, You really get the same effect!
6. Once you're all set with the lamination, take a hole punch (1/8th inch if you're working with a coil planner!) and punch where each of our markings are!
7. Take a pair of scissors, and snip where each hole is, so the dash can be put in your planner, and easily removed!
8. Place your dash in your planner and decorate as you please! I love the target dollar spot sticky notes and use my Post-it flags in class constantly, so it's so great to have them readily available!
Enjoy!!
xoxo, CourtneyBridget
Fiskars 1/8 Inch Circle Hand Punch (23517097J)
Scotch Single-Sided Laminating Sheets, 9 x 12-Inches, Letter Size (LS854SS-10)
Today I thought I would walk you through how I create my own dashboards!
It's so crazy easy, I swear this only took me about 15 minutes once I had all the supplies!
Check at the bottom of this page for the links to where I got all of my supplies [Amazon is bae.]
You will need:
- Decorative paper, printed images, etc.. [full page]
- Scissors
- Hole Punch [1/8th inch if you're working with a coil bound planner!]
- Post-it notes and sticky flags
- Ruler
- Laminating sheets OR packing tape
1. Find 2 patterns you love. You can print them on plain old computer paper, or you can get scrapbook paper, or whatever makes you smile!
I love Lilly Pulitzer so I printed two full pages of some of my favorite patterns!
2. Cut both pages to size. The should be approximately 6.15 inches in length and 8.11 inches in length depending on your planner! I used a note page from the back of my Plum Paper Planner as a guide, but if you have a Kate Spade, or an Erin Condren, you might have to adjust your sizes!
| I left the white edge along the left side so the holes wouldn't cut into the pattern! |
4. Using that note page, or a bookmark from your Erin Condren, mark where each of the holes are for your coil or binder rings with a small black dot.
Now you may be thinking, 'but I want it to be laminated! Fear not! That step is coming! We want to mark our spots before we laminate so the pen marks don't rub off!
5. NOW we laminate! They make really awesome self adhesive laminating sheets that you can use, or you could go the poor girl route like I did and use packing tape! As long as you do it carefully, You really get the same effect!
6. Once you're all set with the lamination, take a hole punch (1/8th inch if you're working with a coil planner!) and punch where each of our markings are!
7. Take a pair of scissors, and snip where each hole is, so the dash can be put in your planner, and easily removed!
| Cut through to the hole, but NOT past the hole! |
8. Place your dash in your planner and decorate as you please! I love the target dollar spot sticky notes and use my Post-it flags in class constantly, so it's so great to have them readily available!
Enjoy!!
xoxo, CourtneyBridget
Fiskars 1/8 Inch Circle Hand Punch (23517097J)
Scotch Single-Sided Laminating Sheets, 9 x 12-Inches, Letter Size (LS854SS-10)
Labels:
Calendar,
college,
Custom,
dashboard,
DIY,
Erin Condren,
girl,
lifestyle,
Lilly Pulitzer,
Organization,
Planner,
Planning,
Plum Paper Planner,
post-its,
Preppy,
school,
sticky notes,
Student
Tuesday, January 19, 2016
What I Wouldn't Do for my Planner...
As I previously told you all, I am in love with my planner.
I'm talking a hardcore.. passionate love....with basically a calendar.
I was always that weird kid in 5th and 6th grade that had all my classwork color-coded. In fact, I used to throw away the school-issued agenda and instead go to the American Girl store and get a fancy 'grown up' planner.
My love continued to grow through high school as I expanded my knowledge to the Vera Bradley and Lilly Pulitzer agendas until finally these past few years, I learned of the magic that is: Erin Condren.............. Well, the student budget version: The Plum Paper Planner.
For anyone who is branching out into the planner world I cannot recommend this planner highly enough. Every single page is customizable. I have my very own one of a kind planner!
As soon as I open my planner I am greeted by the most adorable sticky notes. If you haven't yet discovered the joy that is the Target Dollar Spot, do it.
(If you'd like a tutorial on how to make your own dashboard, please comment below!)
As we continue on, you'll find the year at a glance pages where I circle all important dates whether they be special events, birthdays, anniversaries, etc... This way, when planning way far in advance, I always know what's coming!
Now we get to the really good part, the weekly planner pages, and though I won't show you any 'how-tos' as far as decorating yet, I did want to give you a little peak into my madness!
At the beginning of each month tab, I use the first page of notes to track income and expenses, each date is assigned a line on the page, and I track whatever money goes in or out to keep myself in check!
Next page would be the classic full month view which is one of the things I love about this planner. I love being able to schedule work, and see everything on 2 pages for the entire month!
As you continue to flip through, you'll find the week on 2 pages where I really break things down and write everything that's going on from to-do lists and gym time, to homework!
The last few pages are full of extra notes and a really great little pocket where I keep my Erin Condren: Do It All Dots!
So I hope this little intro got you excited for what's to come! Be on the lookout for Plan With Me posts, and cute little planner DIYs!
If you purchase your own Plum Paper Planner, let them know I sent you!
xoxo, CourtneyBridget
I'm talking a hardcore.. passionate love....with basically a calendar.
I was always that weird kid in 5th and 6th grade that had all my classwork color-coded. In fact, I used to throw away the school-issued agenda and instead go to the American Girl store and get a fancy 'grown up' planner.
My love continued to grow through high school as I expanded my knowledge to the Vera Bradley and Lilly Pulitzer agendas until finally these past few years, I learned of the magic that is: Erin Condren.............. Well, the student budget version: The Plum Paper Planner.
For anyone who is branching out into the planner world I cannot recommend this planner highly enough. Every single page is customizable. I have my very own one of a kind planner!
I thought a great introduction to my planner craziness would be to take you on a walk through my planner and how I've set things up!
As soon as I open my planner I am greeted by the most adorable sticky notes. If you haven't yet discovered the joy that is the Target Dollar Spot, do it.
(If you'd like a tutorial on how to make your own dashboard, please comment below!)
As we continue on, you'll find the year at a glance pages where I circle all important dates whether they be special events, birthdays, anniversaries, etc... This way, when planning way far in advance, I always know what's coming!
Now we get to the really good part, the weekly planner pages, and though I won't show you any 'how-tos' as far as decorating yet, I did want to give you a little peak into my madness!
At the beginning of each month tab, I use the first page of notes to track income and expenses, each date is assigned a line on the page, and I track whatever money goes in or out to keep myself in check!
Next page would be the classic full month view which is one of the things I love about this planner. I love being able to schedule work, and see everything on 2 pages for the entire month!
As you continue to flip through, you'll find the week on 2 pages where I really break things down and write everything that's going on from to-do lists and gym time, to homework!
- The first tip I will give you, is to plan with sticky flags. The world is constantly changing, so instead of permanently marking up your planner, just write out everything on movable sticky flags until you're ready to seriously plan out your week!
The last few pages are full of extra notes and a really great little pocket where I keep my Erin Condren: Do It All Dots!
So I hope this little intro got you excited for what's to come! Be on the lookout for Plan With Me posts, and cute little planner DIYs!
If you purchase your own Plum Paper Planner, let them know I sent you!
xoxo, CourtneyBridget
Friday, January 8, 2016
Welcome!
Well hey there!
I've been toying with the idea of this blog for quite some time now. All this 'New Year, New Me' nonsense really has me feeling enlightened, so here I go!
I'm 20 years old, currently a student at Wagner College studying Arts Administration, which is kind of like the business of theater and the arts! I was born and raised on Long Island, NY, and have fallen into a deep love with this place, and its beaches, its people, its sea air, and of course the bagels.
So what is this blog about you ask? Well, I pride myself on 3 things really. 1: I am the DIY queen. I had a scrapbook that I worked on meticulously from the age of 10, and now I find myself on pinterest scrolling endlessly looking for new ideas, instead of doing any homework. 2: I'm a planner addict. There I said it. I am obsessed with color coding, and fun stickers, and keeping my life and memories in a planner. Fun Fact, I have such an addiction that I even asked for Washi Tape and new pens for Christmas. And 3: I grew up in a household with a Dad who worked in the fashion industry in Manhattan, so I know fashion and I know what all the cool kids are doing. I also know the feeling of walking into a store with $20 in your hand, and all you can afford is a sock, not even the whole pair. Over the years I have perfected the skill of owning that incredible sweater from J.Crew, without having to pay an arm and a leg. (I'm not talking about stealing I promise.
So if you return to this blog which I certainly hope you do, expect to see a ton of DIYs, some cute planner inspiration, and some killer style and discount tricks!
I'm excited to get started, here's to a kick ass 2016!
xoxo, CourtneyBridget
Subscribe to:
Posts (Atom)